In honor of Mother's Day (love you Mel!) I decided I'd post one of our projects that would make momma proud: our pretty DIY terrace planter.
After touring 50+ apartments in the search for our place, we decided an outdoor space, no matter how small, was a necessity. Turns out, ask and you shall receive sista. Our outdoor space is indeed a small balcony, shared with a nosy elderly neighbor and made luxuriously private by a hip-height transparent diamond-weave divider. And I mean nosy neighbor like weekly risking her life to lean over and around the divider to see what's up over here.
After having a few stare-offs from the comfort of my couch with said neighbor, we decided to install an ivy planter on our divider in hopes of creating a nice little privacy wall that gradually obstructed the view. We had been wanting to try our hand at urban gardening anyway so this was a great excuse. Here's how we did it:
Step 1: Head on over to Home Depot.
What we got: 30" Plastic Window Box, 5 Medium Light Ivy house plants, 1 bag of Miracle Gro Potting Mix, 1 trowel, 2 small Terra Cotta pots, 1 spool of twine, 1 can of Rust-Oleum spray paint in Slate Blue and 1 Mrs. Meyer's Clean Day Hand Soap in Basil (not necessary for this project in particular, just obsessed with this stuff). Total cost = $60.
Step 2: Install taller mesh divider.
 |
| We had salvaged this piece from Nick's old IKEA wardrobe which surprisingly fell apart during the move... |
Step 3: Drill holes.
 |
| We (Nick) decided the best way to attach the planter to the divider was by weaving twine through holes drilled in the back. |
Step 4: Apply a few coats of spray paint to the plastic planter.
 |
| I did 3 coats and also applied a little accidentally to our "yard" (yes that's AstroTurf). |
Step 4: Break up Terra Cotta pots - a cheaper alternative to gardening stones to help with drainage.
Step 5: String twine through holes and loop through mesh divider to attach your planter.
 |
| We also used a few zip ties we had on hand to be safe. |
Step 6: Pour potting mix and plant!
Step 7: "Train" the Ivy to grow into the mesh by securing leaves with twine.
Step 8: ADMIRE. You are now a gardening genius.
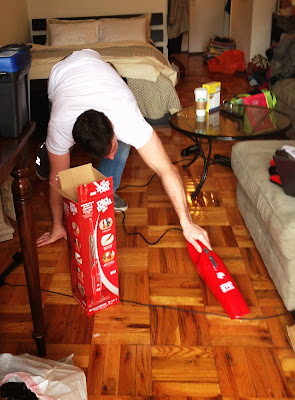
Step 8: Watch your big boyfriend use a tiny Dirt Devil.
 |
| This might not be a step for everyone. But it happened during our project and I recommend it if you like to laugh. |
Happy urban gardening everyone!
Till next time,
Amanda


This is so interesting! I'm planning on moving to NYC this summer and your blog has been very informative! :)
ReplyDeleteThat's awesome! Where are you living? I'm glad you're finding it informative, I'm just kind of stumbling through NYC life up here so however I can help :)
ReplyDeleteI really like the East Village, but wherever I find something I can afford. My boyfriend lives in Connecticut so I’ve been up a lot, but I still need to find some sort of internship or temp job while I’m there this summer…applying all the way from Florida is harder than I thought it’d be!
DeleteYeah EV can be a little hard to swing - I love Murray Hill and I lived on the UES when I first moved here where you can definitely get more bang for your buck. And I totally know how that goes re: applying from Florida. One thing you can do it put your boyfriend's address on your resume - having a Florida address makes some employers nervous that you'll get to NYC, freak out and go back home (as admitted by an employer of mine :) but a CT address is a lot closer. Let me know if I can do anything to help!
DeleteAwesome! Thanks, Amanda!
ReplyDelete